Pole beans are warm-season, tender annuals that are intolerant of both cold and heat. They belong to the legume family, Fabaceae, the third largest of all plant families with about 650 genera and more than 18,500 species, and one of the most important today and in the history of civilization for human food and many other uses. Beans are related to peas, peanuts, alfalfa, clover, and lentils.
Phaseolus vulgaris is the species most commonly grown in home gardens as a pole bean. Phaseolus is the genus that includes the majority of bean species and "Vulgaris" means "common" in Latin. This species includes most beans that are grown as green, yellow, black, turtle, pinto, white, and kidney beans, among others. While "pole bean" may commonly refer to multiple different bean species, GardenZeus information for pole bean covers Phaseolus vulgaris only and may not apply to other species that are often grown as pole beans, including Scarlet Runner bean types (Phaseolus coccineus), Lima beans (Phaseolus lunatus), and Tepary beans (Phaseolus acutifolius).
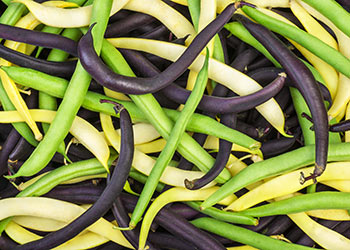
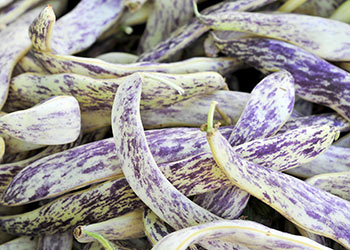
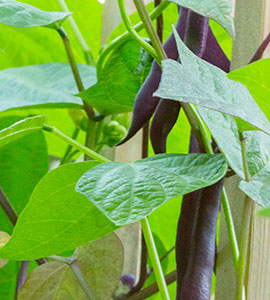
Pole beans generally need more growing space and are more productive per unit of area than bush beans. Colors, size, and shapes of pole-bean seeds and pods vary widely; common pod colors include green, yellow, purple, and mottled with various color combinations.
Pole beans are a unique 3-in-1 vegetable with distinct options for cooking and eating at each of 3 main growth stages:
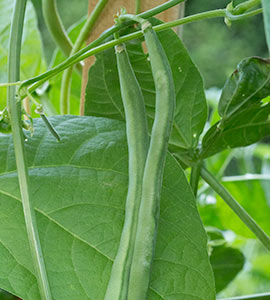
1) immature pods before beans fully form, often called strings beans, green beans, or snap beans, used for cooking, salads, and fresh eating;
2) partially-mature-to-fully-formed beans that are still soft, often called green shell or shelling beans, which are removed from pods that have toughened and are generally no longer edible, for cooking in chili, as baked beans, for sautéing, and for braising.
3) fully mature beans grown until seed pods are brown and dry, often called dry beans, for cooking, often in soups or stews, and for long-term storage.
You are viewing general information for this plant. Enter your zip code below to view localized information:
Kentucky Blue, the child of two popular heirloom parents and an All-America Selection in 1991, is a standout variety for its earliness, vigor, disease resistance, and abundant "stringless" yields.
Both of Kentucky Blue's parents are also reliable choices for most gardens: Kentucky Wonder is an early, delicious, productive, heat-tolerant heirloom offering good quality at all three stages of harvest: snap/green, shelling, and drying. Blue Lake is another outstanding, productive, versatile, 'stringless" heirloom white bean.
For a beautiful and productive purple pole bean, try Trionfo Violetto. For an early yellow wax bean, try Monte Gusto. For a romano-type flat Italian pole bean, famous for heavy yields and mild flavor, try the heirloom Romano.
Buying/Selection Tips
Purchase seeds, not seedlings. Beans are sensitive to root disturbance and transplanting, and should generally be seeded directly outdoors. GardenZeus recommends against growing or purchasing bean starts for transplant, as bean transplants of any age are prone to shock, poor yield, diseases, pests, and other problems.
Pole snap beans can be effectively transplanted within the first 5 to 14 days after germination; this is generally recommend for skilled biointensive gardeners and experienced gardeners who are willing to monitor seedlings closely, time plantings while bean roots are still small, and handle transplants with extreme delicateness.
Soil Needs/Tip
For best germination, health, and yields, beans require reasonable soil fertility, good soil structure with moderate organic matter, moist soil with good drainage, low salinity, and slight-to-moderate acidity, ideally with pH levels between 6.0 and 6.5. Beans can thrive in a range of soil types and textures; some types tolerate slight-to-moderate alkalinity up to a pH of about 7.5.
Bean plants tend to have shallow, spread-out root systems so it's important that upper soil layers are kept moist and fertile until deeper root systems can develop as a result of less-frequent, deeper watering.
Careful attention and management may be necessary to ensure adequate drainage and aeration when growing beans in heavy or clay soils. Bean seedlings require ample soil oxygen for healthy root growth. Oxygen is displaced and quickly depleted in wet soils, which also creates conditions that encourage common bean diseases.
Beans are intolerant of highly acidic soils, high alkalinity, high salinity, compaction, and wet soils; and may become chlorotic, be slow-growing, develop yellowing or discolored leaves, produce minimal-to-no harvest, and otherwise underperform under these conditions.
Beans are light-to-moderate feeders, and are recommended for seasonal or annual rotation with heavier feeders such as tomatoes and squash. Avoid planting beans in the same soil or beds more often than once every 2 to 3 years to reduce concentrations of pests and diseases.
Suitable Microclimate
Pole beans grow best in full sun with warm-but-not-hot daytime temperatures of about 65° to 85°F, when soil is warm and without risk of frost, and in areas or beds with good drainage. Optimal soil temperature for pole-bean-seed germination is 75° to 95°F.
Avoid planting beans in areas or at times where cold air and soil moisture tend to gather, such as at the bottoms of slopes or in depressions;. Be cautions with planting beans at times of year when they will be exposed to excessive cold air, wind, or wet soil.
Pole snap beans can be slightly tricky seasonally in some areas because they are intolerant of cold temperatures in the 30s and low 40s; and also of hot temperatures above about 85°F.
When space allows, GardenZeus recommends growing pole snap beans rather than bush snap beans; check to be certain which type of snap-bean seed you are purchasing and planting, or refer to links in the "Recommended Varieties/Cultivars" section above for pole-bean varieties.
Growing pole beans rather than bush beans will allow for the greatest yield in your available space at all 3 stages of bean harvest (as snap beans, shelling beans, and dry beans). See "Description," above, for more information about the 3 stages of bean harvest.
Yield with pole snap beans varies widely based on many factors, including soil fertility, sunlight, other growing conditions, and bean variety. Generally 1 to 3 pole bean plants per person, planted successively every 2 to 3 months in areas with a sufficiently long warm-but-not-hot growing season, should be sufficient for light consumption of beans, while 5 to 15 or more plants may be needed per person to satisfy bean lovers, especially if harvests are wanted at 2 or all 3 stages of bean development, or dry beans are desired for long-term storage.
When planting beans in new or uncultivated soil, or in soils where beans haven't been grown for a few years, consider inoculating your seeds before planting. Legume inoculants are powders containing Rhizobium bacteria that help legumes to fix nitrogen from the air into root nodules. Pay close attention when purchasing an inoculant to be sure that it is labeled for your intended legume variety(s).
When the simple-but-important conditions are met for bean health, including no root disturbance, well-drained soil, loose soil with good structure, and a warm sunny location, beans can be an easy and rewarding garden vegetable. Under these conditions they tend to be relatively low maintenance and less prone to disease to many other garden vegetables.
Watering Tips
Pole snap beans need consistent, sufficient watering and soil moisture from germination to pod production, especially when flowering and setting pods. When bean plants are healthy in suitable environmental conditions, they often grow rapidly, placing high demand on soil water. Bean plants tend to have shallow, spread-out root systems so it's important to maintain moisture in the upper soil, especially while plants are establishing, and until deeper root systems can develop as a result of less-frequent, deeper watering. While soil moisture is critical for beans, it is also important to have sufficient soil oxygen for beans to form healthy roots and to discourage soilborne diseases.
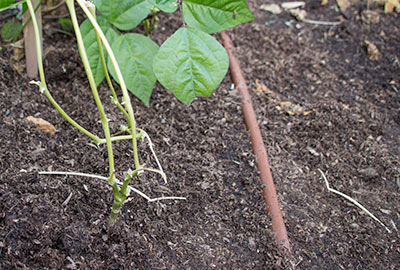
Young pole bean plants with drip irrigation in place
Most pole-snap-bean varieties will need about 1 inch of water per week from late seedling stage or early maturity through harvest. As bean plants establish, shift to deeper and less-frequent watering to encourage deep root systems. The best method of watering beans is generally drip irrigation, which allows for slow penetration of water into soil and encourages healthy root systems.
Other than a rinse every 2 to 4 weeks during dry weather to remove dust and pollutants, leaves of bean plants should be kept dry to discourage the spread of of foliar diseases.
When growing pole snap beans to fully mature dry beans, water normally until the pods are filled out, then reduce watering. When the pods begin to turn brown, reduce irrigation to the minimum needed to prevent wilting, which will help beans to dry in the pods before harvest.
Planting Method/Tips
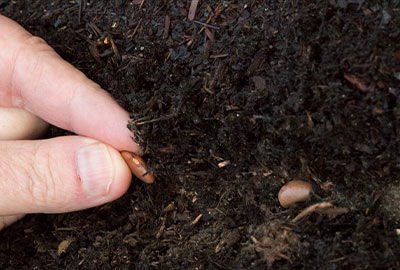
Start seeds directly outdoors during periods without frost and with at least 2-to-3-months' growing season before summer temperatures above 85°F are likely. Optimal soil temperature for pole-bean-seed germination is 75° to 95°F. Seeds may germinate poorly or rot, and seedlings may grow slowly during cold weather.
Pole snap beans can be effectively transplanted within the first 5 to 14 days after germination; this is generally recommend for skilled biointensive gardeners and experienced gardeners who are willing to monitor seedlings closely, time plantings while bean roots are still small, and handle transplants with extreme care.
Loosen soil to at least several inches or double dig beds, and add compost prior to sowing bean seeds. Irrigate or thoroughly moisten soil before planting beans; in heavy clay or poorly drained soils, soils, monitor soil moisture carefully and/or wait a few days or until germination for further watering.
See "Getting Started" in the GardenZeus section "Getting Started" for information about bean inoculant. Beans that are not treated with inoculant may still thrive and produce large yields if soil nitrogen or supplemental nitrogen is sufficient.
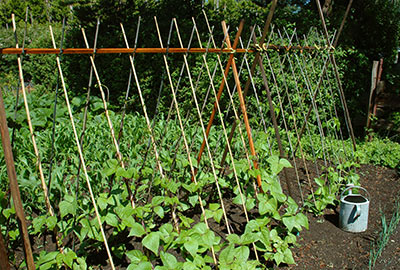
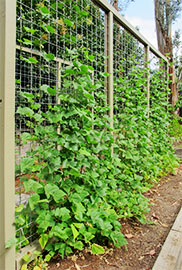
Two options for support: bamboo poles and wire fence
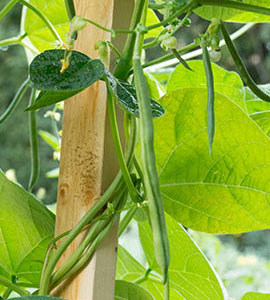
Plan and construct support systems for pole snap beans before seeding. Select sturdy supports that are tall enough for the variety being grown, generally 8 feet or more in height or length for most varieties of pole beans. Single poles or stakes, trellises, and teepee shapes are all effective for pole-bean support. For easy, inexpensive supports use bamboo poles or thin straight sticks lashed together with twine. Use caution to avoid placing supports in a way that will later shade beans or other nearby plants.
Spacing
Plant bean seeds about 1 inch deep. In light, sandy, and dry soils, beans can be planted up to 1.5 inches deep, while in heavier soils beans should be planted 1/2 to 1 inch deep.
Plant pole beans 3 to 4 inches apart along the base of a linear trellis, teepee-like support structure, or other support. Plant seeds about 3 to 5 inches away from the base of your support structure. Pole beans can be planted in double rows and will grow up both sides of a trellis. Pole beans may also be planted in hills of 4 to 6 seeds, with each seed a few inches apart around a single stake or other support. Thin to final spacing of about 4 to 6 inches between plants depending on variety. Hills or rows should be spaced about 2.5 to 3.5 feet apart.
It's best to leave enough space between rows or groups of beans so you can walk between them during harvest.
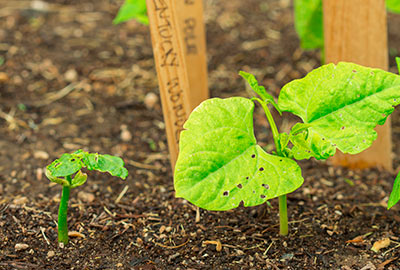
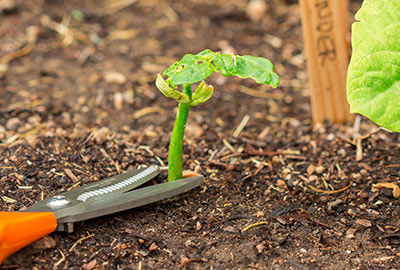
Beans before thinning
These beans have been thinned to final spacing by keeping the strongest plants and removing the weakest
Timelines
8 to 10 days or longer to seed germination. Germination may take 2 weeks or longer, or seeds may rot if soil temperatures are below 60° F.
60 to 85 days from germination to harvest of most varieties, depending upon variety and growing conditions.
As long as you do not disturb the roots, and provide ample, regular moisture, many bean varieties begin to bear snap beans and shelling beans within 2-3 months, while dry beans may require 3 to 5 months.
Harvest period varies; if harvested regularly, many pole bean varieties will produce snap beans for 10 to 14 weeks.
Pollination Needs/Tips
Bean blossom
Bean flowers are perfect and self-fertile. Adequate pollination is required to produce bean pods. Self-fertilization may be variable and many bean varieties benefit from pollination by bees or other insects.
Pollination in beans is negatively affected by cold or hot temperatures, which may also cause flowers to drop, or already-pollinated bean pods to be aborted.
Interplanting/Companion Planting
Plant with carrots, celery, chard, corn, cucumber, eggplant, peas, potatoes, radish, and strawberries. Avoid planting near chives, garlic, leeks, and onions. Pole beans and beets may stunt each other’s growth.
Some sources recommend planting beans or other legumes with plants that need a lot of nitrogen, but this advice may be misguided. Beans and other legumes that are grown to harvest use most or all of the nitrogen they fix in their roots. If roots, or better yet, entire legume plants, are left in soil or tilled under, or beans are tilled under when young before they produce pods and seeds, this may provide additional soil nitrogen to the crop that follows, but plants near actively growing beans and other legumes may obtain little to no nitrogen from the soil-fixing of legumes. If your legumes are fixing nitrogen (which you can determine by checking a few mature roots for nodules that appear pinkish or reddish on the outside or inside), consider rotating in a crop after the legumes that needs significant amounts of nitrogen, such as corn, tomatoes, potatoes, or squash.
The Three Sisters is a traditional Native American agricultural grouping that includes corn, beans, and squash, with corn providing a natural trellis for beans and vining squash, beans fixing soil nitrogen to the benefit of all three crops, and the large leaves of squash cooling soil and discouraging weeds. The Three Sisters can be tricky in some areas, and works best in areas without spring frosts and where summer temperatures are moderate, generally not higher than the mid-80s. Beans need cool-to-moderate temperatures with minimal to no frost, and suffer in heat; while corn needs warm nights and is tolerant of heat. Zucchini falls somewhere in between; it likes cool weather with days as low as 60° F but tolerates heat. Corn is started too late in many areas to provide ideal natural trellising for beans. While actively growing, beans and other nitrogen-fixing legumes may not provide extra nitrogen for heavy feeding by corn and zucchini; for extra nitrogen, beans should be tilled under before flowering.
Nutrient/Amendment/Fertilization Needs/Tips
Beans can be successfully cultivated after a heavy-feeding crop, such as a onions or cabbage. Work compost, composted manures, or well-rotted organic matter into soils before planting.
Beans are able to provide some of their own nitrogen by fixing atmospheric nitrogen through symbiosis with rhizobium bacteria, especially when seeds are properly inoculated or when beans are grown over years in the same beds or garden. When grown in new beds or not inoculated, beans may benefit from supplemental nitrogen every 2 to 5 weeks while actively growing and producing pods, preferably from low-salt sources such as fresh compost or well-composted manures. Beans are sensitive to salinity; be cautious about using amendments that may create excessively saline conditions, such as fresh manures, urea, or chemical fertilizers. Manures may have high levels of salts, depending on the type or source. Too much soil nitrogen may prevent beans from setting pods.
Mulching
Mulch soil to retain moisture, minimize weeds, and keep soils cool during spring and summer, and warm over winter for increased yield.
Pruning/Cutting Back/Pinching/Separating
To maximize yields, GardenZeus does not recommend cutting back or removing pole-bean leaves or stems. Grow bush beans if a more compact bean plant is desired.
Propagating
From seed. GardenZeus recommends open-pollinated, untreated, organically grown seeds.
Container Gardening
Select a container that will accommodate 8 to 9 inches of soil. Provide pole beans with a long stick or pole to climb up (at least 6 to 8 feet tall) or a trellis (5 to 6 feet high).
Varieties to consider for containers: Blue Lake, Kentucky Wonder, Romano, and Helda.
Seasonal Care
Cultivating pole snap beans can be tricky in in some areas because they are fussy about transplanting and generally need to be seeded directly, while also being intolerant of temperature extremes. Timing of direct seeding is critical to avoid poor yields as a result of frost or cold temperatures and also of hot temperatures above 85°F.
Pole beans are usually grown as annuals. Water regularly, from start of pod to set. Water on sunny days so foliage will not remain soaked. Weed diligently and use shallow cultivation to prevent disturbing the root systems. Do not handle beans when they are wet; this may spread fungus spores. Rotate beans to plots where lettuce, squash, broccoli, Brussels sprouts, cabbage, cauliflower, or collards have grown in the past year or two.
How to Harvest
Beans are harvested and eaten at 3 different stages: as snap beans or green beans before seeds mature, as green shelling beans, and as fully mature dry beans. Many varieties are grown for their outstanding quality at one of these stages. Some pole bean varieties are multi-purpose and are exceptional for harvest at 2 or all 3 stages.
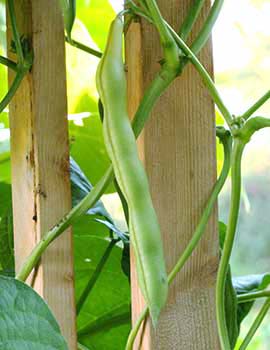
Only the largest is ready for harvest
When beans are harvested immature, as snap beans, plants may produce for 10 to 14 weeks or longer. Snap beans should break in half with a crisp snap when mature, and should not be bulging with maturing beans. To extend harvest of snap beans, harvest frequently, at least every few days. When beans are left on the plant and grown to the shelling or dry-bean stages, the plants will tend to reduce yields and they may stop yielding or die once sufficient pods are allowed to fully mature.
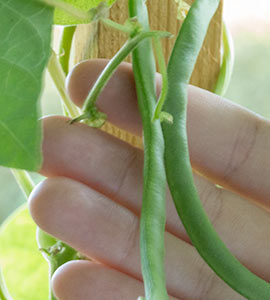
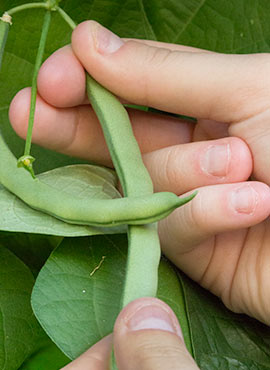
GardenZeus recommends using two hands to harvest beans
Snap beans and shell beans should be gently plucked from the plant by hand, or snipped with garden scissors. Use two hands, holding the bean pod in one, and point where the pod connects to the plant in the other. Pulling on a bean pod with one hand to harvest may break stems or even uproot the plant.
Green shell or shelling beans are harvested when the beans are fully formed but not dry, and the greenness has begun to leave the pods. At this stage the pods are becoming tough, and are not eaten. The beans themselves should be plump and soft, usually larger and without the full color they will have when grown to maturity as dry beans.
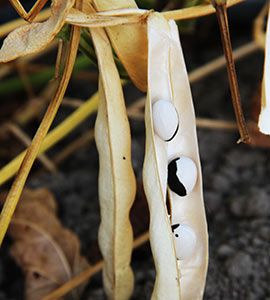
Harvest dry beans when the pods are fully mature, brown, and/or dead, and the beans have colored. If in doubt, test a bean or two by biting it; if you can nick beans easily with a tooth, they aren’t ready for dry-bean harvest. Pick pods on a dry day. Leave them out to dry further in open mesh or wire trays or hang in netted bags, such as produce bags for onions or avocados, in an area with good air circulation, for 2 to 4 weeks until fully dry.
Harvesting Tips
Avoid harvesting beans when plants are wet. Harvest aggressively before heat waves above 85°F, and before cold snaps or frost.
Consistent harvesting of snap beans will encourage production of new pods and longer-lived vines.
Snap beans are generally ready for harvest about 2 to 3 weeks after bean flowers bloomed, and may be produced by a given plant for 10 to 14 weeks or longer if harvested every few days. Handle snap beans carefully to avoid bruising tender skins.
Shell beans have a relatively short harvest window of about 10 to 18 days before they begin to mature into dry beans.
When growing pole snap beans to fully mature dry beans, water normally until the pods fill out, then reduce watering. When the pods begin to turn brown, reduce irrigation to the minimum needed to prevent wilting, which will help beans to dry while hardening before harvest.
What Commonly Goes Wrong
Blossom drop: Bean plants will drop blossoms due to low humidity, excessive smog or air pollution, dry soil or unevening water, wind, excessive soil nitrogen, daily or consistent high temperatures above 85°F, heat waves above 90°F, and cold and/or wet weather.
Flowering without setting pods: This may be caused by poor pollination/lack of pollinators, zinc deficiency, dry soil, inconsistent watering, excessive soil nitrogen, or high temperatures.
Low yield: Overly wet soil, dry soil, or infertile soil may result in slow-growing or stunted plants and low yields. Bean plants produce fewer or no new pods while maturing existing pods; harvests of snap beans may be greatly reduced if if bean pods are allowed to mature.
Deformed pods: May be the result of lack of moisture, poor soil fertility, or insect damage during blooming.
Tough or fibrous bean pod: This occurs naturally as pods mature and most commonly is the result of pods being left unharvested on the plant for too long. It may also be caused by warm or hot temperatures during pod set.
Not a Problem
Are your pole-bean vines so vigorous that you're running out of real estate on your trellis, support, or stake? Many pole-bean varieties grow vigorously to 10 feet in length. If your beans are growing past the trellis height, you can loop them over and encourage them to work their way back down a sunny area along their trellis or support.
Common Diseases
Common bean diseases include stem or root rots, damping off, mildews, bacterial blight, mosaic virus, curly top, and bean rust.
Bacterial blights and white mold: Avoid wetting foliage if possible. Water early in the day so above ground plant parts will dry as quickly as possible. Avoid crowding plants. Space apart to allow air circulation. Eliminate weeds from around plants to improve air circulation.
Bean common mosaic virus (BV-1 and NY 15): remove and discard or destroy entire infested plant along with immediately surrounding soil and soil clinging to roots. Grow resistant varieties, including Blue Lake, Helda, and Kentucky Blue.
Various bacteria and fungi may cause rot and kill plants and plant roots, especially in wet soils. Dry out soils, encourage a healthy soil ecosystem, and practice crop rotation.
Damping Off: Caused by soilborne fungi that may suddenly kill smaller seedlings and starts. Occurs most commonly in cool, damp soils.
Mildews: Powdery and downy mildew appear as a whitish circles or whitish layers on the upper or lower surfaces of leaves, yellowing or dead spots, or pale or yellow angular leaf sections, and may be mistaken for other problems, such as nutrient deficiencies. Powdery mildew is more commonly a problem in your zone than downy mildew. Avoid wetting foliage when watering. Some mildews can be discouraged using a nontoxic homemade spray of one tablespoon each of baking soda and tea tree oil per quart of water, shaken vigorously and regularly as applied via spray bottle. Mildews are often difficult to control and are best managed through prevention and good cultural practices, such as planting resistant varieties, planting in areas with good air circulation, keeping foliage dry, less-frequent irrigation, encouraging biologically active "living" soil that will support strong plant immune systems, and rotating crops. Mildews are often not fatal and beans may produce reasonable yields of fresh uninfected leaves despite ongoing infections on older leaves.
Curly top virus is a disease spread by leafhoppers. It may affect a wide range of vegetables and other plants. In leaves are stunted, leaf margins are rolled upward, and leaves become brittle, irregularly swollen and/or puckered along the veins.
Mosaic viruses are also transmitted by leafhoppers, as well as aphids. Encourage populations of beneficial predatory and parasitic insects by creating habitat and planting plants that provide nectar. Strengthening your garden ecosystem will help diminish dramatic insect problems.
Common Pests
Mexican bean beetles: handpick and destroy beetles and eggs in small plantings. Plant early to avoid this pest. Turn under any infested plants after harvest.
Aphids: a hard stream of water can be used to remove aphids from plants. Wash off with water occasionally as needed early in the day. Check for evidence of natural enemies such as gray-brown or bloated parasitized aphids and the presence of alligator-like larvae of lady beetles and lacewings.
Leafhoppers: small, light green to gray wedge-shaped insects that suck plant juices, causing stunting, and carry viral diseases.
Seedcorn maggot: avoid heavy manure or organic matter in garden which attract maggot flies and encourages egg laying. If maggots are a severe or ongoing problem, consider purchasing treated seeds. Use gloves when planting.
Spider mites (two-spotted): wash off with water occasionally as needed early in the day. A hard stream of water will often remove the majority of mites.
Root knot nematode can be a severe problem for growing pole beans if soils are infested.
Special Care
Handle your saved and stored bean seeds with care. Although bean seeds are hard and seem sturdy, they may be damaged if handled carelessly, dropped, or banged around, particularly if seeds are not fully dry and/or mechanical impacts are repeated. Internal seed damage may result in stunted or unproductive plants.
Special Info
Pole beans are more productive than bush beans per plant and per unit of space for a home gardener, and offer a much greater range of varieties, flavors, colors, and other unique characteristics. The majority of of heritage and heirloom bean varieties from the American Southwest are pole-bean types, many of species other than Phasesolus vulgaris.
Most large-scale and commercial bean production is from bush bean varieties, because plants are more uniform and bush-bean crops can be mechanically harvested. As a result, many unique, delicious, and beautiful varieties of pole beans are becoming unknown and even at risk of being lost. By planting and saving seeds of unusual and heritage pole bean varieties, home gardeners can contribute to the preservation of pole bean diversity.
Sustainable Landscaping Tip
Consider exploring the diversity of species and heirloom varieties of pole beans from the American Southwest. Many of these bean varieties have adapted to dry and arid conditions over hundreds of years, and were grown traditionally grown with rainfall only and no additional irrigation from farmers.
Advanced Tip
Get creative when building a trellis for your pole beans, and consider using unique, reclaimed, or found materials to make a charming support. Consider creating a beautiful and edible children's (or adults') hideout by building a large, stable teepee structure planted with vigorous, tall pole-bean varieties, that can double as a shade structure and seating area in your garden.
Preservation, Storage, and Use
As with most vegetables, snap or green beans are at their best just after picking; if not cooked or eaten after harvest, cool snap or green beans immediately for optimum storage life. Under ideal storage conditions of 32° F and 95% relative humidity, green beans will store well for 7 to 10 days. If stored at normal refrigerator temperatures, they are best eaten within a few days. Snap or green beans can also be lightly blanched and frozen for future use.
Green beans are moderately sensitive to ethylene gas, so when placing your green beans in your refrigerator, take care to place them far away from your ethylene-producing fruit.
Bean leaves are edible and can be surprisingly palatable, especially when young and tender, for eating fresh, in salads, steaming, sautéing, or stir-frying.
Shell beans can be a wonderful culinary companion because they are close to "al dente" out of the shell and also often have a delicate sweetness missing from stored dry beans. For fine or gourmet cooking, fresh shell beans easily trump dry beans. Shell beans also cook easily, without soaking and without long periods for prep or cooking as is often needed for dry beans, and can be used for baked beans, chili, in any dish for dry or canned beans, or as a green vegetable sautéed or braised. GardenZeus recommends blanching and freezing for storage of shell beans.
Stored dry beans may be prone to damage by bean weevils. After harvesting and cleaning dry beans, GardenZeus recommends freezing the beans for 1 week in air-tight plastic bags to kill any bean-weevil larvae or eggs, after which beans can be confidently stored for later eating or replanting.